

How to Edit Product Photos with Krea 3
The difficult part of an AI product-photo edit is keeping the product accurate while changing its surroundings. For a Krea 3 editing brief, start with a clear product photograph, identify the features that must survive, and change one part of the scene at a time. Check those features before judging the lighting or mood.
This tutorial uses an olive canvas bag: the pocket shape, zipper, seams, handles, and fabric matter as much as the new background. The same inspection method works for furniture, accessories, and packaged goods. The prompts below are examples to adapt, not results from a hands-on Krea 3 test.
Prepare the source before writing the prompt
Suppose you need a landscape campaign image of the bag on a pale bench, with space on the left for a headline. Choose a photograph showing the complete bag from the angle you want to keep. If the bottom, handles, or zipper are hidden, the model has to infer them.
A second image is useful when it supplies missing information. Another nearly identical front view may add little; a readable close-up of the zipper or stitching can answer a specific question.
| Reference | What it should control | What it should not control |
|---|---|---|
| Main product photo | Shape, proportions, handles, pockets, and color | Final background |
| Optional detail photo | Zipper construction or a visible seam | Overall framing |
| Optional scene reference | Bench placement, light, or empty space | The design of the bag |
Use a scene reference without another bag when possible. Otherwise, the reference may introduce a competing shape or detail. When the setting is simple, describing it in words may be clearer than attaching another image.
If you use Image to Prompt to describe the source, check the description against the photograph. Remove a guessed fabric, brand, or fastening. A plausible description of a different bag is a poor starting point for an accurate edit.
Make the first edit deliberately small
For Krea 3 access and reference limits, follow the getting-started guide. You can also try this general editing brief with the available image models in the Krea3.ai workspace.
Select image-to-image, attach the product source, and choose one output in the required aspect ratio. Before submitting, check the model, image order, and displayed cost. Adapt this prompt to the actual bag:
Use the first image as the product source. Preserve the bag's outline, handle length, front pocket, zipper placement, seam lines, and olive canvas texture. Place the bag upright on a pale wooden bench against a soft neutral wall. Keep the source camera angle and leave the left third of the image clear for a headline. Use gentle light from the right. Add no text, logos, extra straps, or decorative fittings.
If a second photo is attached, add:
The second image shows the zipper and stitching in more detail. Use it for those details only, without changing the overall view.
Remove that sentence when there is no second image. Do not ask for a new color, a different fabric, and a reverse camera angle in the same first attempt. Each adds another reason for the product to change.
The fal Krea 3 prompting guide provides provider examples of reference-based editing. The bag brief here is an independent example; it does not guarantee preservation.
Inspect the bag before approving the scene
Open the source and result side by side. First compare the silhouette and proportions, then work through the construction details. Zoom in, but also inspect the final display size: a technically sharp image can still crop the product badly.
| What went wrong | A useful next step |
|---|---|
| The pocket has changed size or position | Return to the original source; state the pocket's position and remove competing product references. |
| The zipper or seams disappear | Add a clearer detail view and request a simpler setting. |
| Canvas looks like leather or plastic | Remove conflicting material words and use a source with readable fabric texture. |
| A scene reference contributes another bag | Remove it and describe the bench and light in text. |
| Props occupy the headline area | Simplify the scene and specify a clear left third. |
| A small label becomes invented lettering | Restore approved artwork in a finishing editor instead of regenerating the whole image repeatedly. |
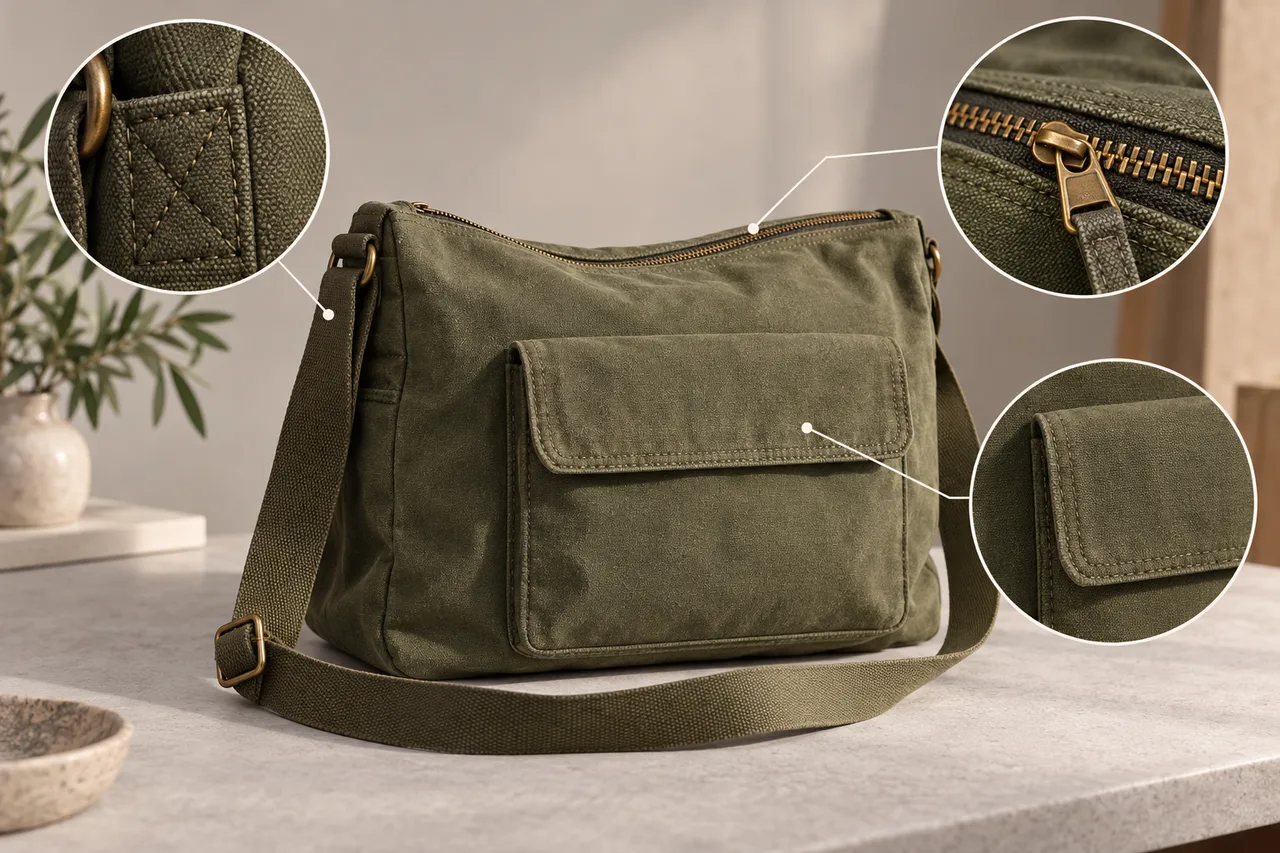
AI-generated inspection illustration. It shows what to examine, not a Krea 3 test result.
Keep an accepted result as a comparison, but return to the original product photograph when the design drifts. Building another edit on an already distorted pocket can carry that mistake into the next image.
Decide when to stop regenerating
Set a small trial budget before starting. A practical editorial rule is to allow a first attempt and a small number of targeted corrections, then review whether the input or the method needs to change. This is a planning choice, not a model limit.
If the product is correct and only a local edge or label needs attention, a finishing editor may be more efficient. If an important side of the bag was never photographed, obtain a better reference. If a listing requires exact material color, measurements, or label text, use verified product assets and check the final image against them.
Record the reason for each rejection. Repeated zipper failures suggest a different next step from an otherwise accurate image that merely needs more copy space. That record helps you avoid paying for the same unresolved problem again.
Build the campaign set from an approved brief
After one scene passes inspection, keep the source, aspect ratio, product description, and acceptance criteria fixed. Change the environment instruction for the next scene. Compare the resulting pair for pocket placement, hardware, proportions, and fabric appearance before expanding the set.
Add final headlines and approved logos in your layout tool. Check the downloaded files at the required dimensions, including crop and text placement. Save the prompt, reference order, selected settings, and accepted result together so another revision can reproduce the brief.
For a campaign whose visual style is still undecided, Krea 3 vs Krea 2 explains how style exploration differs from preserving an existing product.
Documentation checked October 16, 2026. This workflow is editorial guidance; product accuracy must be checked on the actual output.